TL;DR
Acoustic dampening in a closet isn’t about total soundproofing but reducing reflections and echo. The best approach combines thoughtful mic placement, layered absorption, and proper airflow to keep noise out and vocals clear.
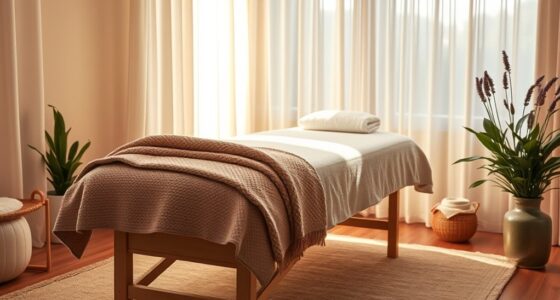
If your closet sounds like a tin can or a cave, you’re not alone. Many creators turn to closet rigs for quick, affordable vocal setups—yet they often struggle with echo, boxiness, or background noise. The importance of acoustic dampening in a closet setup can’t be overstated. The good news? A few smart tweaks can turn that cramped space into a surprisingly effective recording booth.
This guide cuts through the noise, focusing on what truly matters: dampening reflections, strategic placement, and airflow. You’ll learn how to treat your closet’s surfaces, position your mic for clarity, and keep your gear cool without turning your room into a sauna. Whether you’re podcasting, singing, or voice-overing, these tips will make your closet sound better—without breaking the bank.
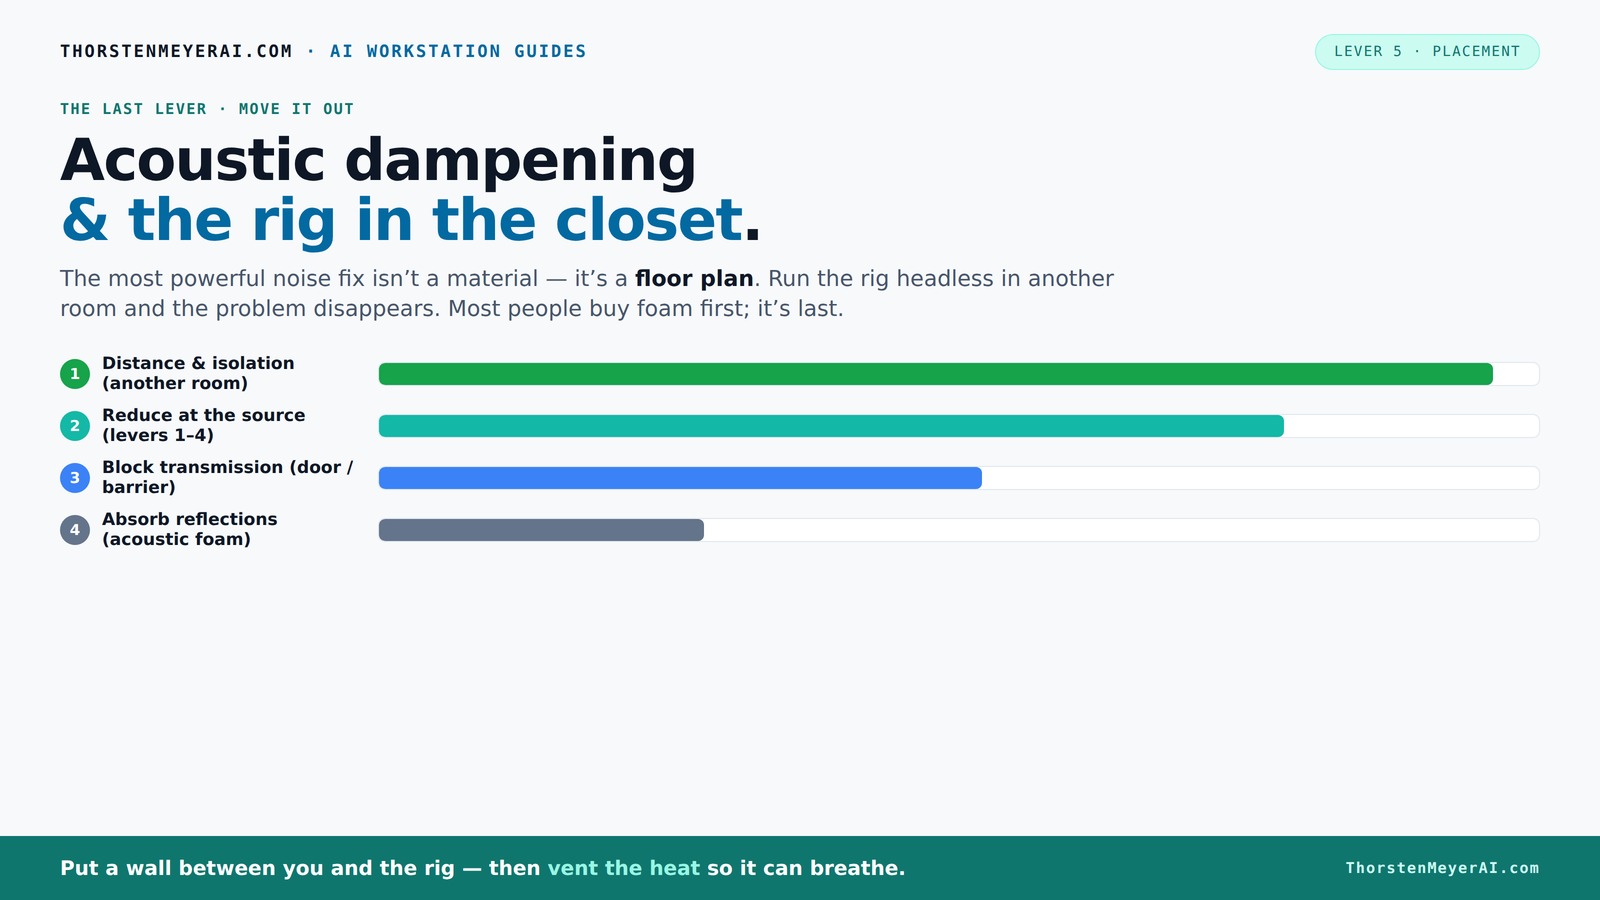
Acoustic dampening
& the rig in the closet.
The most powerful noise fix isn’t a material — it’s a floor plan. A rig you can’t hear because it’s in another room beats any amount of foam. Tap the approaches in Part 1 to see what actually works.
(another room)
(levers 1–4)
(door / barrier)
(acoustic foam)
Contain the noise, not the heat
Key Takeaways
- Prioritize distance and isolation over absorption; moving your rig out of the room is the most effective noise reduction.
- Treat the main reflection points—walls, ceiling, and floor—using layered absorbent materials for clearer vocals.
- Seal gaps around the closet door and use blankets or foam to block sound leaks, especially at the door and cracks.
- Address low-frequency buildup with bass traps in corners; don’t rely solely on foam panels.
- Ensure proper ventilation to prevent heat buildup, using quiet exhaust fans or ducting for safety and performance.

Focusound 52 Pack Acoustic Foam Panels 1" x 12" x 12" Sound Proof Foam Panles Soundproofing Noise Cancelling Wedge Panels for Home Office Recoding Studio with 300PCS Double-Side Adhesive
Soundproofing - Acoustic foam panels triangular grooves structure for better noise absorption, helps to reduce and absorb unwanted...
As an affiliate, we earn on qualifying purchases.
As an affiliate, we earn on qualifying purchases.
Why Dampening Matters More Than You Think
Acoustic dampening is about controlling how sound bounces inside your closet. Think of it as softening a drum’s echo to make vocals clearer. Foam panels, blankets, and rugs absorb reflections, preventing that 'boxy' or 'boomy' sound.
When you dampen reflections, you're effectively reducing the ambient reverberation that causes vocals to sound distant or muddy. This makes your recordings more direct and present, which is crucial for professional-sounding results. However, there's a tradeoff: over-dampening can deaden the natural warmth and liveliness of your voice, making it sound dull or flat. Striking the right balance is key—use enough treatment to tame excessive reflections but preserve some natural resonance for a warm, natural tone.
Research shows that in small rooms, low-frequency buildup can cause muddiness, which is often overlooked. Thick, dense panels or bass traps in the corners help tame these frequencies, preventing them from overwhelming your mix and ensuring clarity and punch in your vocals. Proper dampening not only clarifies your sound but also reduces the need for heavy EQ adjustments later, saving you time in post-production.

XTUGA Recording Microphone Isolation Shield, High Density Absorbent Foam 5 Panels to Filter Vocal,Top Enclosed Foldable Soundproof Cover for Condenser Studio Equipment MIS02
REDUCES NOISE INTERFERENCE– The XTUGA Microphone isolation Shield has three layers that work in tandem to reduce noise...
As an affiliate, we earn on qualifying purchases.
As an affiliate, we earn on qualifying purchases.
The Best Placement Tips for a Closet Rig That Actually Works
Where you position your microphone and gear impacts how much reflection and ambient noise you capture. Proper placement can dramatically improve clarity and reduce unwanted echoes. For more tips, see this guide on acoustic dampening placement. Start by placing the mic about 6-12 inches from your mouth—closer than you might think—to minimize room sound and focus on your voice. Keep the mic away from the closet walls and ceiling because these surfaces reflect sound directly into the capsule, causing comb filtering and echo.
Position the mic in the 'sweet spot,' which is where reflections bounce the least directly into the capsule—usually slightly off-center and away from reflective surfaces. For small closets, aiming the mic slightly away from the door and walls helps reduce the bounce of sound waves, cutting down on boxiness. Using a small, adjustable stand allows you to experiment with angles and distances to find the clearest, most natural sound.
Additionally, treat the ceiling and floor by adding absorbent materials or rugs. This prevents sound from bouncing upward or downward, which can cause phase issues and muddiness. Remember, the goal is to isolate your voice from the room's reflections without creating an overly dead sound. Proper placement balances direct sound and minimal room influence, resulting in clearer, more professional recordings.

VEVOR Sound Dampening Blankets, Soundproof Curtains with 80 x 48 in, Soundproof Blanket with Grommets, Studio Grommeted Blanket, for Window, Door, Light Blocker, Music Recording, Black
Sound Absorption & Noise Reduction: Made with a polyester woven surface and recycled cotton filling, this 3-layer physical...
As an affiliate, we earn on qualifying purchases.
As an affiliate, we earn on qualifying purchases.
Treating Walls, Door, and Corners — What Really Matters
In a tiny closet, every surface reflects sound, contributing to a cluttered, indistinct recording. Effective acoustic treatment strategies can help. Covering the walls with acoustic panels or blankets helps soften the space, but knowing where to treat is crucial. Focus on the reflection points—these are spots where sound bounces directly into the mic. Use a mirror to locate these points: position yourself so that when you look into the mirror, you see the reflective surfaces behind the mic. These are your primary treatment targets.
Corners are hotspots for low-frequency buildup because sound waves tend to concentrate there, creating a 'boominess' that can muddy your vocals. Learn more about tackling low frequencies at this resource on low-frequency management. Adding bass traps or thicker foam in these areas absorbs these low-end frequencies, tightening your sound. Sealing gaps around the door is equally important—sound leaks through cracks and can ruin your quiet space. Using weather stripping or draft stoppers helps contain your recordings and prevents external noise intrusion.
For instance, hanging moving blankets over the door can significantly reduce sound leaks and improve absorption at the same time. Remember, the goal is to address the main reflection points and low-frequency hotspots; over-treating can make the room sound unnaturally dead, so aim for a balanced approach that preserves some natural warmth while controlling problematic reflections.

MUSICUS B-Free 2.0 Modular Vocal Booth for Recording, Portable Sound Isolation Booth for Home Studio, Voice Over & Podcast, 4-Layer Acoustic Panels, Built-in Ventilation (Medium, Black)
Tested Performance: Up to 26 dB sound reduction; NRC 0.89 absorption; KCL third party test data available; built...
As an affiliate, we earn on qualifying purchases.
As an affiliate, we earn on qualifying purchases.
Low Frequencies and How to Tackle Them in Small Closets
Small rooms tend to trap bass frequencies, resulting in a 'boomy' or muddy sound that’s difficult to fix with foam panels alone. These standing waves and low-end buildup occur because of parallel walls and tight spaces where sound waves reflect and reinforce each other, creating peaks and valleys in your frequency response. If unaddressed, this can make your vocals sound muffled or overly resonant, complicating mixing and reducing clarity.
Adding thick bass traps in the corners absorbs these troublesome low frequencies before they bounce around. For detailed advice, visit this article on bass trapping. DIY traps made from rockwool or dense foam can be effective and affordable. For example, installing 4-inch thick panels in every corner can turn a muddy, boxy sound into warm, tight vocals with more definition. Experimenting with the placement and density of these traps is crucial: stacking multiple layers or using dense materials helps flatten the frequency response.
Understanding the physics behind low-frequency buildup allows you to target problem areas specifically, creating a more balanced and controlled sound. This approach ensures your recordings have clarity and punch, even in a tiny, reflective space where bass tends to dominate.
Ventilation and Heat: The Hidden Challenges of a Closet Rig
Placing a high-power rig in a closet solves noise issues but can cause heat buildup, which is often overlooked. Find tips on managing airflow and heat at Nightly Solutions. Trapped heat can lead to equipment overheating, throttling performance, and louder fans, which introduce unwanted noise into recordings. Managing airflow is essential not just for comfort but also for the longevity and reliability of your gear.
Active ventilation—such as a small, quiet exhaust fan—keeps air flowing and prevents heat accumulation. The fan should operate quietly, ideally under 20 dB, so it doesn’t interfere with your recordings. Installing a ducted exhaust with a thermostatic switch can automatically turn on the fan when temperature thresholds are reached, maintaining a stable environment during long sessions. Additionally, adding small intake vents or open windows can help maintain airflow without sacrificing too much soundproofing. Proper placement of vents ensures continuous circulation, preventing hot spots and reducing noise from overheating.
Check out the [low-noise PC case airflow guide](https://thorstenmeyerai.com/low-noise-pc-cases-airflow/) for detailed ideas on quiet ventilation solutions. Remember, controlling heat is as important as controlling sound for a reliable, effective closet rig.
DIY Solutions vs. Professional-Grade Setup: Which Is Right for You?
DIY treatment with blankets, foam, and rugs can significantly improve your sound quality, but it’s not a one-size-fits-all solution. The effectiveness of DIY methods depends on proper layering, placement, and sealing. For example, simply hanging blankets may reduce some reflections but won’t address bass issues or external noise leaks. Layering multiple materials—such as foam, dense blankets, and bass traps—creates a more comprehensive barrier, improving clarity and reducing unwanted noise. Proper sealing around gaps, doors, and vents is often more impactful than adding more foam.
Pro-grade solutions include custom soundproof cabinets, high-quality bass traps, and ducted airflow systems. These require a larger investment but can turn a noisy closet into a near-professional studio. For instance, a creator used thick acoustic panels, bass traps, and a vented cabinet to achieve studio-quality sound without echoes or heat issues, demonstrating the value of a tailored, high-end setup.
Deciding between DIY and professional-grade setups depends on your budget, goals, and the level of sound isolation you need. DIY is quick, affordable, and flexible, suitable for hobbyists or those just starting out. Professional solutions, while more expensive, provide a cleaner, more controlled environment, ideal for serious projects or streaming. Understanding these tradeoffs helps you choose the best approach for your needs.
Frequently Asked Questions
Is a closet good enough for recording vocals?
Yes, a closet can work well for vocals if you treat it properly. Focus on reducing reflections, sealing gaps, and adding absorption layers. It’s not perfect for loud sources, but for singing, voice-over, and podcasts, it can be excellent.What is the difference between acoustic dampening, treatment, and soundproofing?
Acoustic dampening reduces reflections and echo inside a space, making vocals sound warmer and clearer. Treatment involves adding panels or blankets to soften sound. Soundproofing stops noise from leaking in or out—it's about blocking transmission, not just controlling inside sound.Where should I place my microphone in a closet booth?
Place your mic about 6-12 inches from your mouth, aiming away from walls and the door. Avoid placing it directly in front of reflective surfaces. Experiment with positioning to find the spot with the least echo and most natural sound.Should I treat the walls, ceiling, or door first?
Start with the reflection points on the walls closest to your mic, then move to the ceiling and floor. Sealing or treating the door is crucial to prevent sound leaks. Prioritize gaps and cracks around the door for quick wins.Do foam panels really work in a closet?
Foam panels help absorb mid- and high-frequency reflections, reducing echo and boxiness. However, they won’t stop low-frequency buildup or sound leaks. Layering foam with other treatments yields the best results.Conclusion
A closet rig can produce surprisingly professional sound—if you treat it as a small, reflective space rather than a sealed box. Focus on damping reflections, positioning your mic carefully, and maintaining airflow. These simple steps turn a cramped closet into a quiet, warm vocal booth you’ll actually want to record in.
Remember: the best soundproofing isn’t just about absorbing noise; it’s about controlling how sound moves and where heat goes. Your closet can be more than a makeshift booth—it can become your secret weapon.